THỜI SỰ


THỂ THAO


ĐỊA PHƯƠNG


GIẢI TRÍ


THIẾU NHI


FM-RADIO


QUỐC TẾ


Trong thời đại số hóa ngày nay, việc xem TV không còn chỉ là việc ngồi trước màn hình truyền hình trong phòng khách. Với sự tiến bộ của công nghệ internet, chúng ta có thể truy cập vào thế giới đa dạng của nội dung truyền hình từ mọi nơi, bất kỳ khi nào chúng ta muốn. Và giữa hàng ngàn trang web và ứng dụng cung cấp dịch vụ xem TV online, có một địa điểm đã trở thành điểm đến lý tưởng cho những người yêu thưởng thức nội dung giải trí miễn phí đó chính là apwavlinkwifi.com.
Giới Thiệu Về Trang Web Xem TV Online
Do nhu cầu hiện nay của người tiêu dùng là cần sự nhanh nhẹn và tiện lợi. Việc xem TV không còn như trước đây là ngồi trước TV tại nhà để xem nữa. Giờ đây tâm lý của một người khách hàng là muốn có thể xem TV mọi lúc mọi nơi không bị bó buộc bởi điều kiện không gian.
Nắm được mong muốn đó, các nhà sáng lập của chúng tôi đã đưa ra trang web xem TV online miễn phí để cung cấp các dịch vụ tốt nhất, tiện lợi đúng như những gì mà một người khách hàng cần. Chất lượng của trang web phải nói không có điểm nào để chê, chúng ta cùng dành một chút thời gian để tìm hiểu xem những điều đặc biệt có tại trang web này nào.

Giới thiệu về nền tảng xem TV online
Những Lý Do Vì Sao Bạn Nên Chọn Trang Web Xem TV Online
Ngày nay, việc chọn lựa một trang web đáng tin cậy và phù hợp với nhu cầu của bạn là vô cùng quan trọng. Dưới đây là ba lý do tại sao bạn nên chọn trang web xem TV online của chúng tôi:
Hoàn toàn miễn phí
Chúng tôi hiểu rằng giá trị của việc tận hưởng giải trí không nên đo lường bằng tiền bạc. Trang web xem TV online của chúng tôi không yêu cầu bạn trả bất kỳ chi phí nào. Khi truy cập trang web bạn có thể xem những chương trình yêu thích của mình mà không cần lo lắng về hóa đơn hoặc giới hạn xem sót.
Chất lượng hình ảnh siêu mượt
Chúng tôi tận dụng công nghệ tiên tiến nhất để đảm bảo rằng mỗi chi tiết trên màn hình của bạn được hiển thị với độ nét tối đa. Không có việc giật lag hay giảm chất lượng khi bạn xem chương trình trên trang web của chúng tôi.
Trải nghiệm khách hàng tốt
Chúng tôi cam kết mang đến cho bạn trải nghiệm khách hàng không phải mà tốt mà phải gọi là xuất sắc. Nếu bạn gặp bất kỳ vấn đề nào hoặc cần hỗ trợ, chúng tôi sẽ nhanh chóng giải quyết mọi vấn đề của bạn để đảm bảo rằng bạn có trải nghiệm xem trực tuyến hoàn hảo.

Lý do nào bạn nên xem TV online
Những Tính Năng Nổi Bật Của Web Xem TV Online
Nếu bạn nghĩ đây là trang web đơn thuần là xem TV online thì đây hoàn toàn sai, chúng tôi đã vượt qua giới hạn của 1 nền tảng xem TV truyền thống nghĩa là chỉ đơn thuần là truyền phát thông tin mà không quan tâm trải nghiệm khách hàng. Giờ đây bạn có thể tha hồ sử dụng những tính năng nổi bật của web xem TV online để việc xem TV trở nên thú vị hơn.
Đa dạng kênh
Tại địa chỉ trang web của chúng tôi, xem TV nó không có khái niệm của giới hạn. Chúng tôi cung cấp cho bạn một thế giới của đa dạng với hàng trăm kênh truyền hình từ khắp mọi nơi trên thế giới. Từ các bộ phim điện ảnh độc đáo cho đến các sự kiện thể thao nổi tiếng, bạn sẽ dễ dàng lựa chọn những chương trình yêu thích của mình, bất kể bạn là người hâm mộ của giải đấu thể thao hay là người say mê các chương trình giải trí.
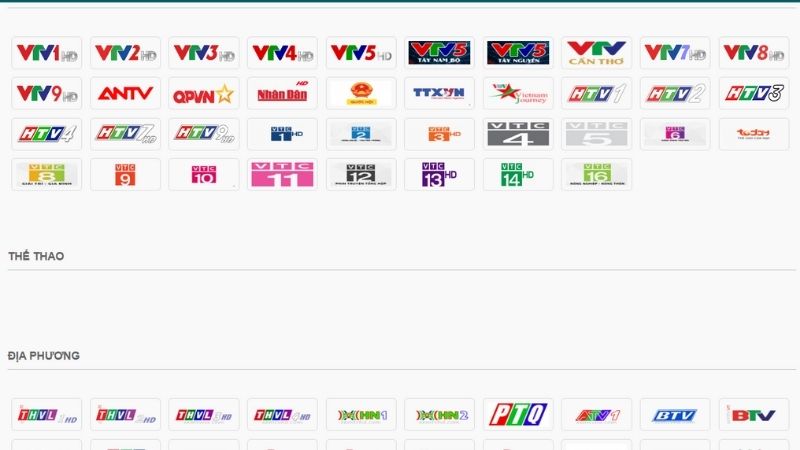
Trải nghiệm đa dạng kênh
Tương tác người dùng khác
Trang web xem TV online của chúng tôi là cộng đồng nơi mà người xem có thể kết nối và chia sẻ cảm xúc. Bạn có thể tham gia thảo luận các cuộc trò chuyện trực tuyến, thảo luận về các tình tiết trong các tập phim mới nhất, và gặp gỡ những người xem có sở thích giống bạn.
Xem lại chương trình
Cuộc sống hiện đại đầy bận rộn khiến bạn không thể theo dõi mọi chương trình yêu thích ngay lúc phát sóng. Khác với TV truyền thống, với tính năng xem lại chương trình của chúng tôi, bạn không cần lo lắng về việc bỏ lỡ bất kỳ tập phim hay sự kiện thể thao nào quan trọng. Bạn có quyền xem lại bất cứ khi nào bạn muốn, tạo ra một lịch trình xem TV linh hoạt phù hợp với cuộc sống của bạn.
Tính năng xem lại dành cho những người bận rộn
Các Thể Loại Kênh Truyền Hình Được Truy Cập Tại Xem TV Online
Khi truy cập vào kênh xem TV online bạn sẽ đến với những thể loại kênh khác nhau vậy những kênh đó là gì?
Thể thao
Với những kênh thể thao được cập nhật tại kênh xem tivi trực tuyến sẽ đưa bạn đến thế giới của những trận túc cầu hàng đầu trên thế giới. Từ Ngoại Hạng Anh đến Giải Vô Địch Tây Ban Nha… Bạn đều có thể xem trực tiếp trên nền tảng này như xem tivi tại nhà.
Phim
Với kênh xem TV trực tuyến bạn sẽ thỏa chí mà xem tất cả các thể loại phim trên đời. Từ những tác phẩm điện ảnh đầy kịch tính đến những bộ phim nghệ thuật sâu sắc, mỗi câu chuyện được kể qua ống kính của máy quay là một hành trình đưa bạn đến các thế giới khác nhau, từ hồn lãng mạn đến thế giới tưởng tượng đầy màu sắc.
Giải trí
Với loạt kênh giải trí rất thích hợp với giới trẻ. Bạn có thể xem những gameshow truyền hình hay các chương trình thực tế vui khác sớm nhất ngay trên chính điện thoại của chính bạn. Với thể loại giải trí xem tivi VTV6, bởi theo nhiều người xem VTV6 có rất nhiều chương trình như Ai là triệu phú, Đường lên đỉnh Olympia…
Thiếu nhi
Kênh thiếu nhi là tập hợp những chương trình giúp trẻ có thể khám phá bản thân mình. Các chương trình thiếu nhi trên trang web của chúng tôi không chỉ là những câu chuyện cổ tích, mà còn là cách tuyệt vời để trẻ em khám phá thế giới xung quanh, học hỏi giác quan và phát triển tư duy sáng tạo.
Các loại kênh có trong xem TV online
Các Câu Hỏi Thường Gặp Khi Xem TV Online
Sẽ có một vài câu hỏi liên quan đến trang web, dưới đây là bài tổng hợp các câu hỏi và câu trả lời chúng tôi muốn gửi đến bạn.
Làm thế nào để trang web đảm bảo chất lượng khi có nhiều người dùng truy cập cùng một lúc?
Trang web của chúng tôi cam kết đảm bảo chất lượng hình ảnh và âm thanh tốt trong mọi tình huống, kể cả khi có nhiều người dùng truy cập cùng một lúc.
Đầu tiên, chúng tôi sử dụng các máy chủ mạnh mẽ và được tối ưu hóa để xử lý lượng truy cập lớn một cách hiệu quả. Hơn nữa, chúng tôi sử dụng công nghệ streaming tiên tiến, cho phép chúng tôi điều chỉnh chất lượng video tự động dựa trên tốc độ internet của người dùng.
Nếu kết nối internet tăng cường, hình ảnh sẽ tự động được nâng cao độ phân giải để mang lại trải nghiệm xem tốt nhất. Chúng tôi cũng tối ưu hóa việc sử dụng băng thông, đặt ưu tiên cho việc truyền tải nội dung chính để giữ cho mỗi người dùng đều có thể xem các chương trình yêu thích của mình mà không gặp gián đoạn.
Bằng cách này, chúng tôi không chỉ đảm bảo chất lượng cho mỗi người dùng riêng lẻ mà còn tạo ra một trải nghiệm xem tivi online mượt mà và không gián đoạn khi có nhiều người dùng truy cập cùng lúc.

Làm thế nào khi quá nhiều người xem cùng lúc
Có cung cấp các tính năng tương tác như bình luận, đánh giá không?
Có, trang web của chúng tôi cung cấp các tính năng tương tác như bình luận, đánh giá và chia sẻ nội dung. Chúng tôi khuyến khích người dùng tham gia vào cộng đồng bằng cách chia sẻ ý kiến, nhận xét và đánh giá về các chương trình. Tính năng bình luận giúp người xem tương tác với nhau, thảo luận về nội dung và chia sẻ quan điểm cá nhân, tạo ra một không gian trao đổi ý kiến sôi động và thú vị.
Trang web có tùy chọn giảm băng thông để giảm tình trạng giật lag không?
Tất nhiên, chúng tôi cung cấp các tùy chọn giảm chất lượng để đảm bảo trải nghiệm xem không bị gián đoạn khi tốc độ internet không ổn định hoặc khi người dùng muốn tiết kiệm băng thông. Người xem có thể điều chỉnh chất lượng video theo sở thích hoặc theo điều kiện kết nối của mình, từ chất lượng tiêu chuẩn đến chất lượng thấp.
Với tính năng này giúp chúng tôi đảm bảo rằng người dùng sẽ có thể xem các chương trình mà không gặp trở ngại do tốc độ internet thấp, đồng thời giúp người xem kiểm soát việc sử dụng băng thông theo nhu cầu của mình.
Làm thế nào để người dùng có thể tìm kiếm trợ giúp khi gặp vấn đề khi xem TV online?
Chúng tôi cung cấp một hệ thống hỗ trợ toàn diện để giúp người dùng khi gặp vấn đề khi xem Ti vi online. Trang web của chúng tôi có một trang Hỗ Trợ hoặc Trung Tâm Trợ Giúp, nơi người dùng có thể tìm kiếm câu trả lời cho các câu hỏi thường gặp, hướng dẫn sử dụng, và các vấn đề kỹ thuật.
Ngoài ra, chúng tôi có một dịch vụ hỗ trợ qua email hoặc chatform, người dùng có thể gửi câu hỏi cụ thể và nhận được sự giúp đỡ từ đội ngũ hỗ trợ của chúng tôi. Đồng thời, chúng tôi còn cung cấp một số hotline hỗ trợ điện thoại 24/7 để giải quyết các vấn đề ngay lập tức và đảm bảo rằng mọi trải nghiệm xem TV của người dùng mượt mà.

Gặp vấn đề khi xem thì làm sao
Với những thông tin mà chúng tôi cung cấp chúng tôi tin chắc trang web xem TV online là nơi bạn có thể trải nghiệm những giây phút thư giãn cùng gia đình. Còn chần chừ gì nữa hãy truy cập apwavlinkwifi.com để có trải nghiệm tuyệt vời nhất.